Michael Sanders and the Destiny of the Qori, the rewritten, longer version of my original novel is now available for Kindle or paperback.
I was never happy with the arch of the first version of the book. I left it alone for years, but eventually, I felt like the book needed a sequel. As I started working out the details I decided to just add to the original story. The first half of the book is about the same, with just a few edits and changes. The second half is all new, adding to the story of Michael being chosen to yield the Illia, the coins that give him the power to travel through time and space. I added more characters and a big, bad antagonist, something the first book didn’t really have.
This is a middle-grade novel for ages 9+. I tried to keep it interesting enough that anyone young at heart will enjoy reading it.
I hope you’ll check out the new version of the Michael Sanders story. It’s a great read for kids or the young at heart.
I’ve been working on another website project. It’s an attempt to generate some cash using affiliate marketing links. I’ve been using ChatGPT to write articles recently. It’s a great learning experience. Here are some of the articles.
I’ve been thinking a lot about starting or buying a business lately. It’s no easy feat, and I want to write out some of my thoughts. It might help me work through some things.
I grew up in a very busy household. My parents ran a masonry construction business. My dad was out in the field working on job sites, quoting, solving problems, and generally running himself ragged. My mom worked in the office. I’m pretty sure it wasn’t her first choice for a career, but she made it work.
Both of my parents were busy and stressed. Running a business, especially a construction business has lots of challenges. A couple that come to mind (from what they complained about the most) were employees and customers.
Employees because they broke stuff, messed up work, lost stuff, didn’t come to work, claimed workers comp for stupid reasons, broke more stuff. You get the idea.
Customers because they didn’t pay. I see the challenge of doing a job that doesn’t always pay until the work is completed. It’s a rough business model because you can’t really repossess a new basement after you build it. A lean isn’t the same, but it was a common enough thing that I learned about them when I was pretty young.
So what kind of business would I want to run?
I’ve worked in manufacturing now for more than a decade, so my mind first goes to a small manufacturing company. But what? I’ll come back to that.
There are also service companies, restaurants, and vacation properties. I would group all of these together because they are more traditional and would require more interactions, employees, and financial support to get started.
All of those things stress me out. They’re not insurmountable, just challenging.
On the other side of my personal entrepreneur spectrum are sole proprietorship opportunities.
This could be something like freelancing as a writer or project manager. Something like this could start small and maybe grow with time.
Of course, as this websites existens shows, I would love to be a full time fiction writer, but I haven’t given that the effort or time that it really needs.
I’ve been on tic tok recently. Lots of people on there pushing their affiliate marketing ideas. It sounds too easy, I know it’s not. But I did start a blog, https://toolreviewsplus.com, just to try it out. I also have affiliate links under some of my youtube videos and on other articles on this page. The idea here was to just test the water a little bit. The idea is too aluring to pass up.
I also had an idea to start a blog with my wife. It would be written from her point of view. I think she has lots of great ideas and a well thought out point of view. This idea goes back to our days as parents of young children when every mother had an opinion of what was the best way to raise or discipline or feed their kids. I just knew that she had good ideas and others needed to hear what she had to say. But nothing ever came of it. Maybe someday I’ll still make something like that happen.
We have other ideas, businesses that we could run together. I mentioned manufacturing above. I still have no idea what we would make, but she’s said that she’s willing to try something with me if the right idea comes along. We look at business listings together sometimes.
And she often talks about buying or starting some kind of restaurant. She’s an amazing cook. She was selling baked goods at a local farmers market for a while. She had a good following a loyal customers, but it was so much work. On a good day, we estimated she might average out to $12-$15 per hour. Fair, but it wasn’t going to change our life. And it was so exhausting. I fear a restaurant would be kind of like that, but with more overhead.
Mostly, I like the idea of being my own boss, but I’m afraid of the risk and challenges. I have a good job. It doesn’t bring the most happiness, but our bills are paid. We’re comfortable.
Maybe someday this blog will announce some new business venture. For now, I’m just sharing my musings, and looking for an excuse to post a backlink to my affiliate blog up above. Don’t visit it. I’m kind of embarrassed about it.
Since posting the video to the internet the kind and helpful people at reddit and YouTube, (sorry that should say, KiNd AnD HElPFuLl) I’ve learned a few things about my installation. So, let me just say that this project isn’t yet completed. In the future, I will be installing a filter at the intake, and I will be replacing the flexible duct with straight duct.
Now that that’s out of the way…
Youtube video of me installing the vent system. It’s my first major video project and it’s pretty rough.
We have lived in this house for 11 years. For the first 10 years we had no ventilation from our kitchen, so every time my wife cooked something that made a lot of smoke we would need to open our windows or face the dreaded False Alarm from the smoke detectors. In the spring of 2021, I installed a vent over the range in our kitchen as part of a larger remodel. The goal was to remove smoke when cooking something like naan or hamburgers. It was not meant to be a grease hood or grease trap. We’ve had the fan in place now for a couple of months. I would guess we’ll run this thing for a few hours every year.
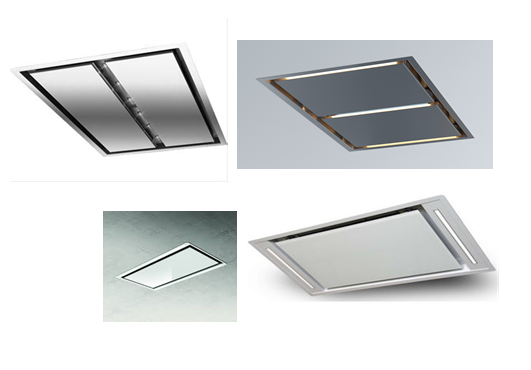
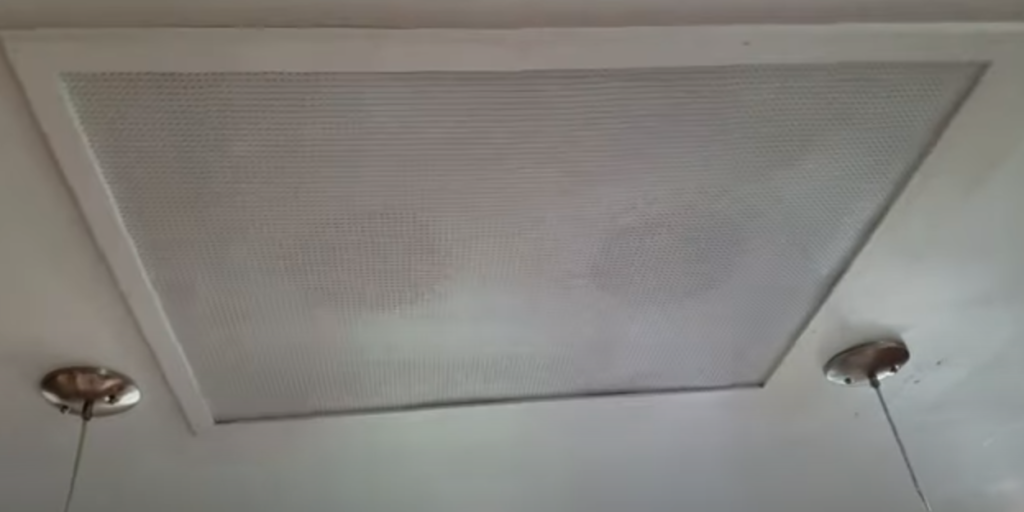
We started with online research. My wife found the flush mount ceiling vents and knew that she wanted something like that. It would clear out the smoke, but not be obtrusive or hang down into the kitchen. The few that we could actually find for sale cost thousands of dollars and/or had to be shipped from Europe. I do think these will become more popular where building code allows.
After a bit more research, I decided that this was a project that I could do. I started making a plan and buying components. Overall, the project took me about four months. There were lots of other projects going on with the remodel, plus we have kids, I work a full-time job, and I’m good at making up excuses. Recording the video added a layer of difficulty as well. Props to full-time YouTubers who do huge projects and top-notch video editing. I know most of the big ones have a team of people to help now, but they started small and that’s not easy.
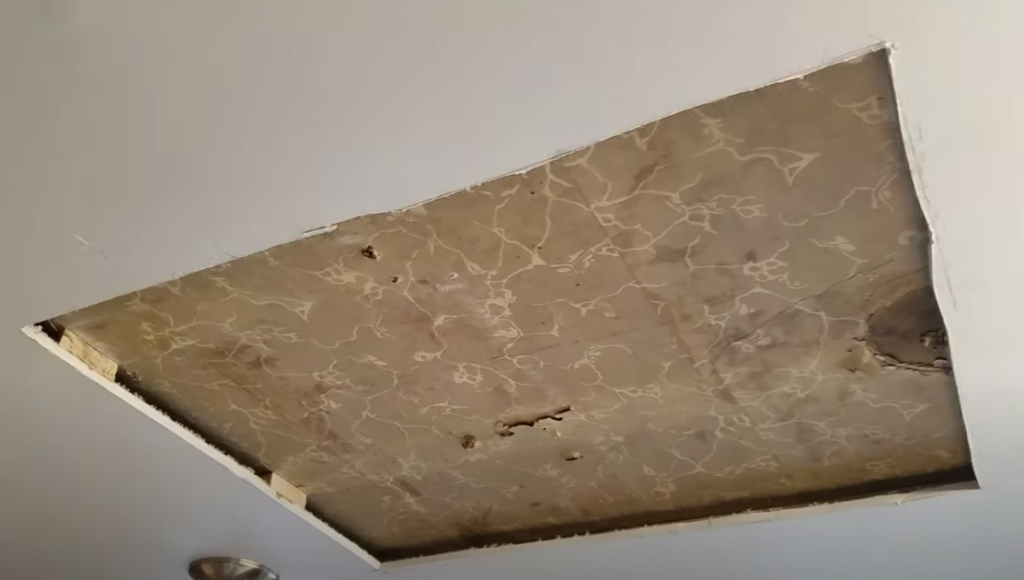
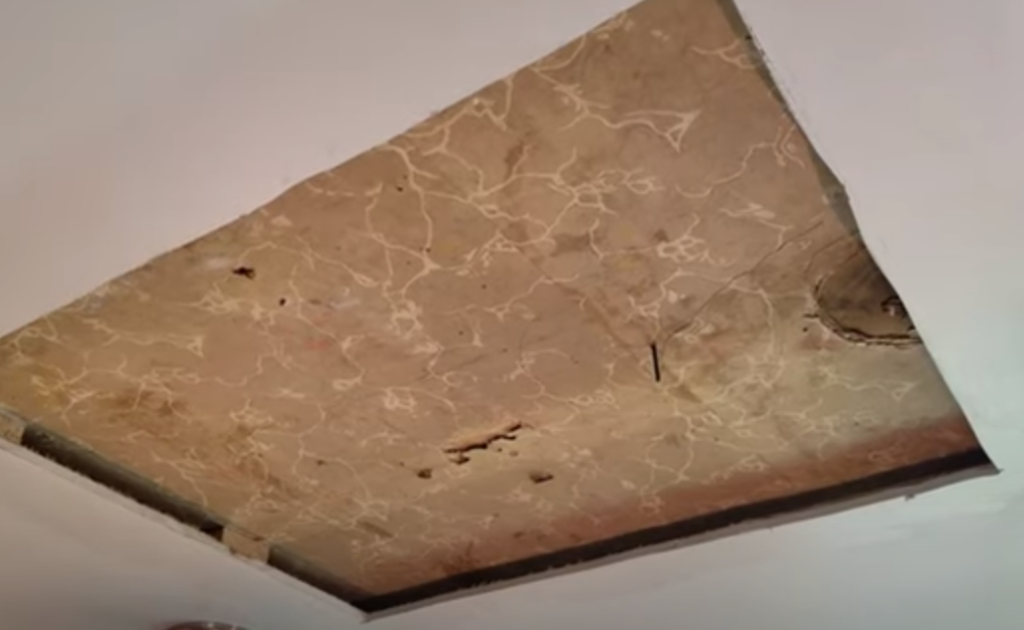
The very first thing I did was measure and cut a hole in the ceiling above the range. I wanted to know what surprises were hiding in the ceiling and get a sense of the size of the pan that I would need to build. I’ve done a little bit of sheet metal work in the past. This was very basic stuff.
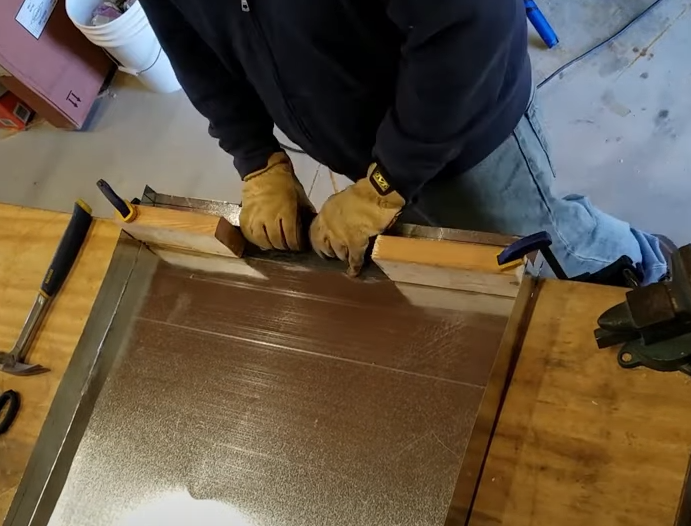
I made the pan out of some sheet metal I purchased at my local home center. After laying out all my cut and fold lines I started cutting. I left the outer lip of the pan long so that I would have more metal to grab for bending.
To make the first set of bends I used two pieces of 1.5″ angle iron from the hardware store. I cut them to the longer inside length of the pan. The first bends I made were the shorter inside lengths, then I could put the angle iron inside the pan to make the next set of bends. I bent the corner tabs by hand. I used a smooth-faced hammer to tighten the bends.
I used a sheet metal folding tool for the bends that would make up the lip of the pan. I used a hammer again to help shape the corners. Don’t try to make the whole bend all at once. Start by forming your crease in the metal, then move down the length of the piece to move the remaining metal to match. Repeat this and bend the metal a little at a time for the best results.
To help the pan hold its shape I left tabs in the cutout. I folded these tabs over and then used an awl to puncture the metal. I held a piece of wood behind the metal for support. Then I drilled the holes to the proper size for some rivets. I used just one rivet per corner. That was enough to help the pan hold its shape.
After everything was riveted and secure, I marked the outer edges and cut them down to size. With a little more care it would have been possible to make the outer edges connect with forty-five-degree angles. I decided that wasn’t necessary here, since everything will be hidden when the project is done.
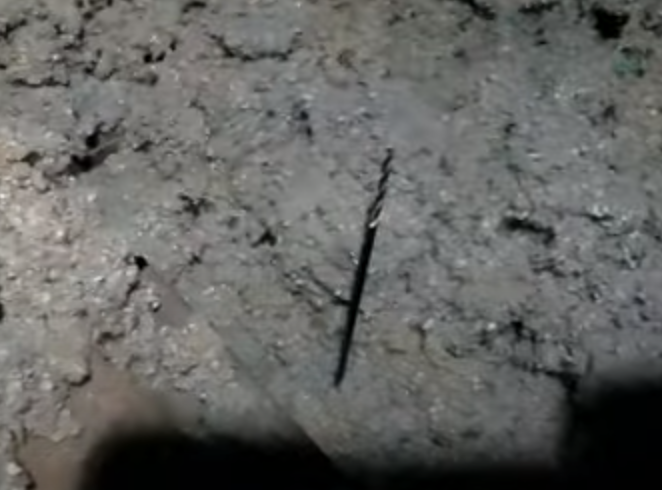
Back to the hole in my ceiling. I used a probe bit, or installer’s bit, to drill up through the ceiling. This bit is 1/16″ x 12″ long. It’s very useful for figuring out where you’ll end up on the other side of a wall or ceiling. In this case, I was hoping that my holes would line up as expected in the attic space. I was pretty sure of my locations because I had been in the attic for some other projects recently.
Here’s the bit in the attic, almost exactly where I expected it to be.
I don’t like working in the attic. I know I’ll need to go up there again, but I don’t have to be happy about it. If you can avoid attic work in the summer you definitely should.
I made a scoop out of an old gallon bottle and started moving the insulation out of the area where I needed to work. I didn’t want any of the insulation to fall into our kitchen when I started cutting holes.
I think this is common knowledge, but I feel like I should say it anyway. If you’ve never worked in an attic before you should know that you cannot step on the floor itself. The joists are safe, the “floor” is actually just the ceiling from below and a miss-step will put you right in the room below where you’re working. My attic does have some extra boards for walking in some places. Also, be sure to wear protective equipment like an air filter.
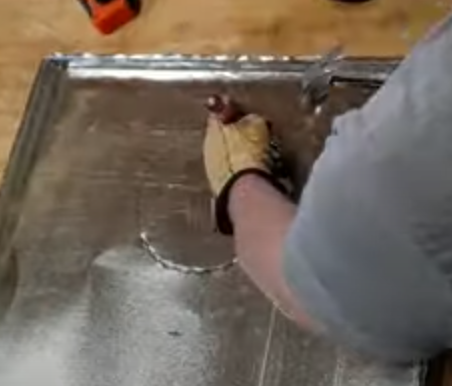
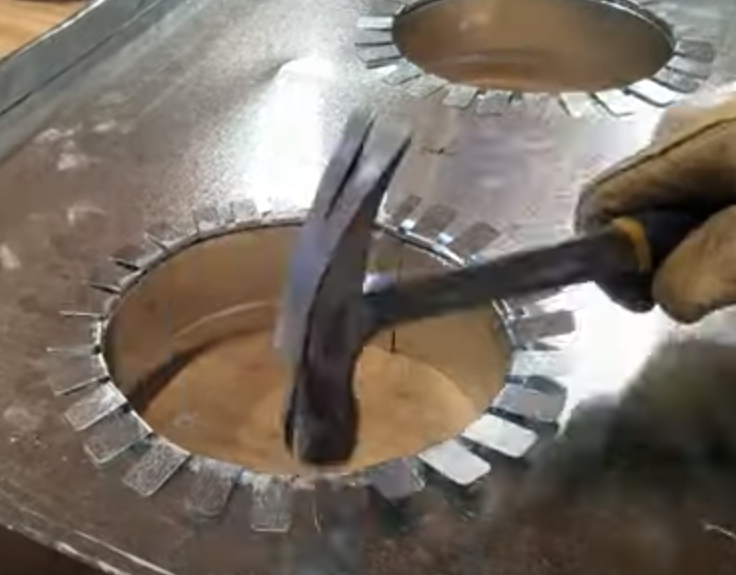
After I confirmed my layout in the attic it was time to start cutting the holes in the pan. I marked the circles for the duct connections, then I used a chisel to punch little slices in the sheet metal, kind of nibbling my way around the circle. I hammered into a scrap block of wood so I wouldn’t damage my table.
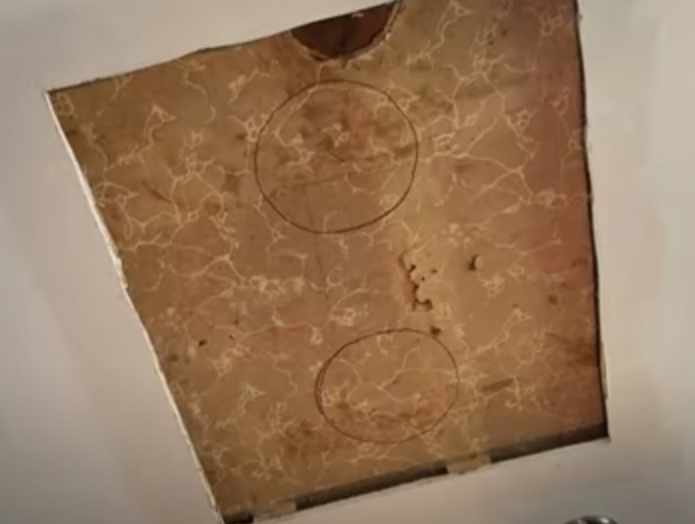
I used the pan as a template to transfer the circles onto the ceiling.
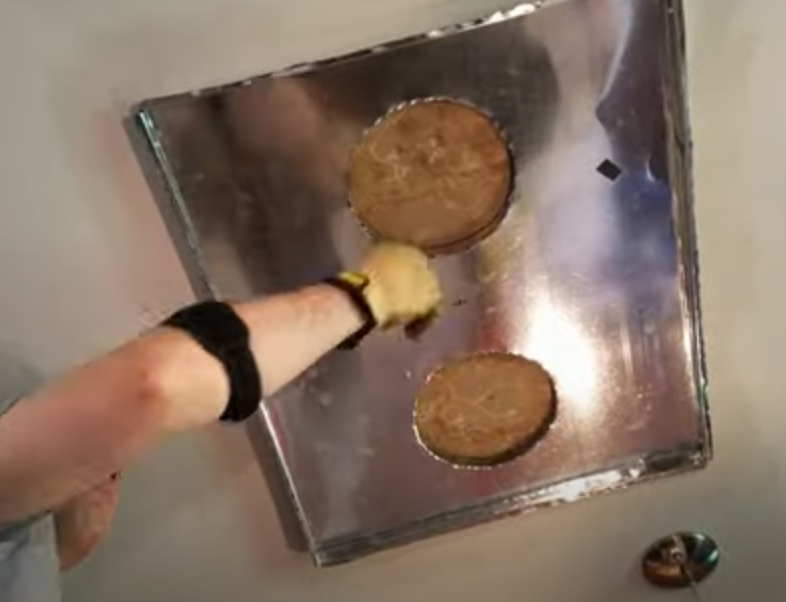
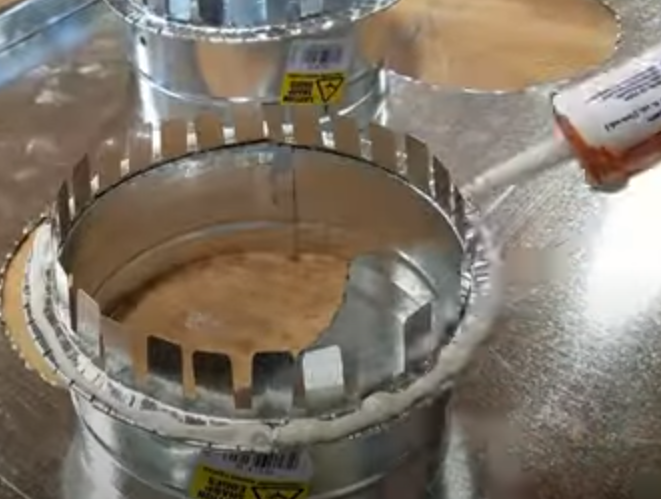
Back in my shop, I used water-based duct sealant to attach the take-off connections to the pan. I used a hammer to fold down the tabs nice and tight.
I used an oscillating saw to cut the holes in my ceiling. There was a drop cloth down over the counter to catch dust. This makes a bit of a mess.
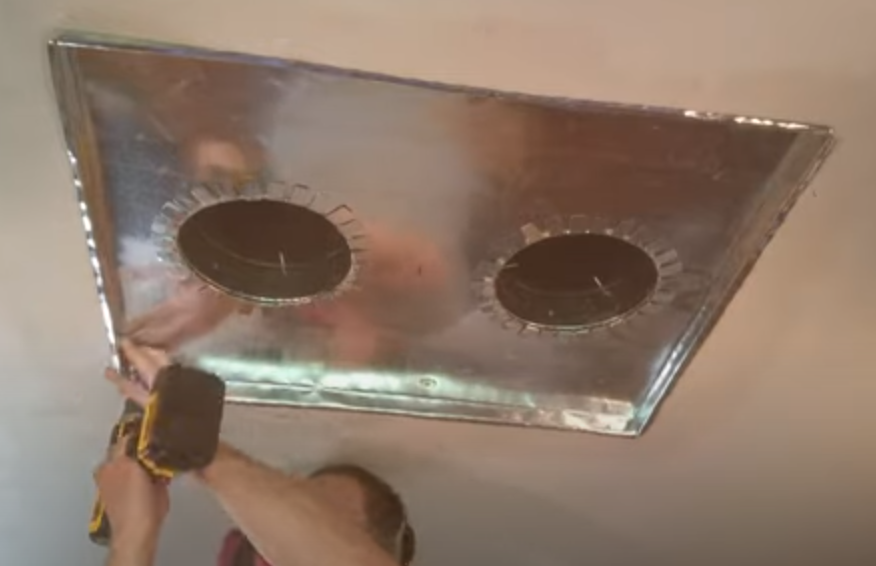
After the holes were cut and the pan assembly fit properly I used some screws with washers to attach it to my ceiling. I screwed up into the joists. I also put some screws in the corners. I was lucky here because my ceiling has plywood between the joists and the drywall. This makes for a very secure attachment point. If I didn’t have the plywood I would have used adhesive.
I put the elbow and tee sections of the pipe together in my shop before installing the pan assembly. This made the attic work a little bit easier.
I used lots of foil tape to hold everything together tight.
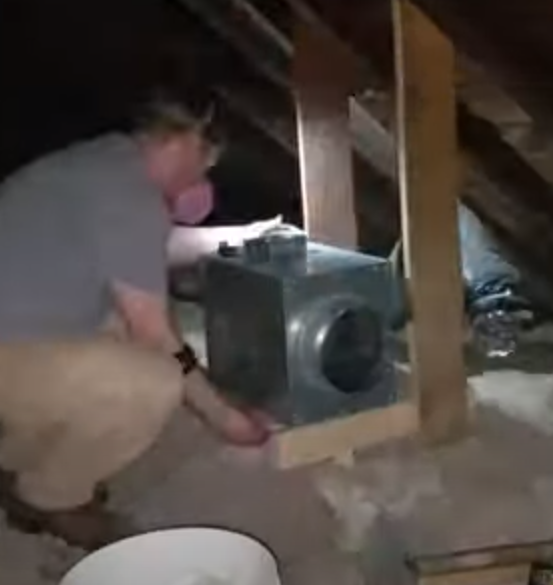
The in-line blower I selected was mounted on some wood supports that were already in place. My home had a “Whole-House” ventilation system that we disabled because it didn’t work properly. Our old farmhouse is not sealed tight enough to need a fan like this. It was installed as a way of removing excess moisture from the home, but most of the connections had fallen off.
After the blower was mounted, I finish the wiring and connected a backdraft damper to the inlet port. I’m not sure if it matters what side of the blower the damper was attached to. Nobody on reddit mentioned that as a complaint. The purpose of the backdraft damper is to prevent cold air from moving back into the house through the duct lines.
I was able to use some of the wiring from the old fan system to connect this new blower. I routed the wires up to a switch under the counter near the stove.
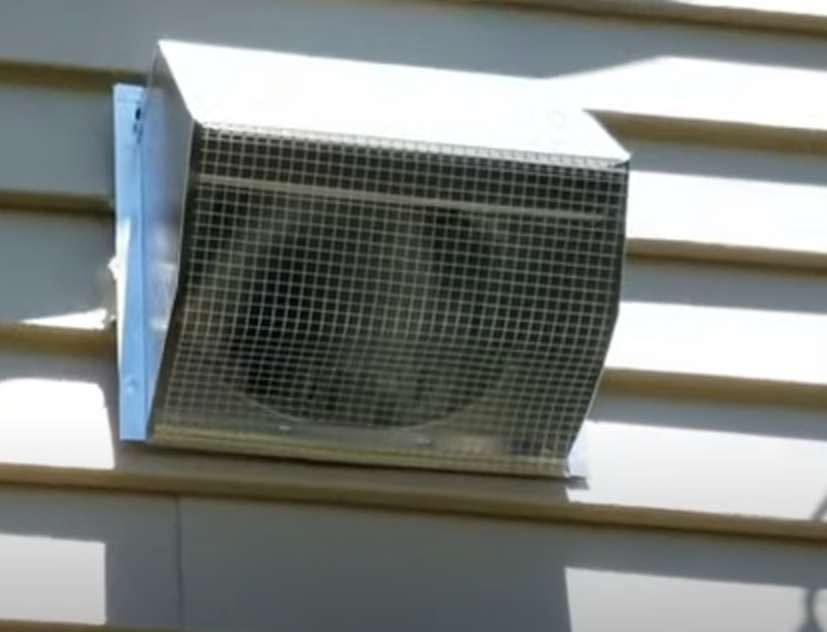
I connected all the duct lines with flexible duct, which I’ve learned will need to be upgraded in a future project, so I’m not going to go into too much detail here. Essentially, I connected all the duct work and ran it out, through my garage, to a wall vent on the exterior of my house.
I was careful to make sure all the connections were sealed and secure. I don’t want anyone to complain about my work in the future the way I complained about the whole house fan installation in my video.
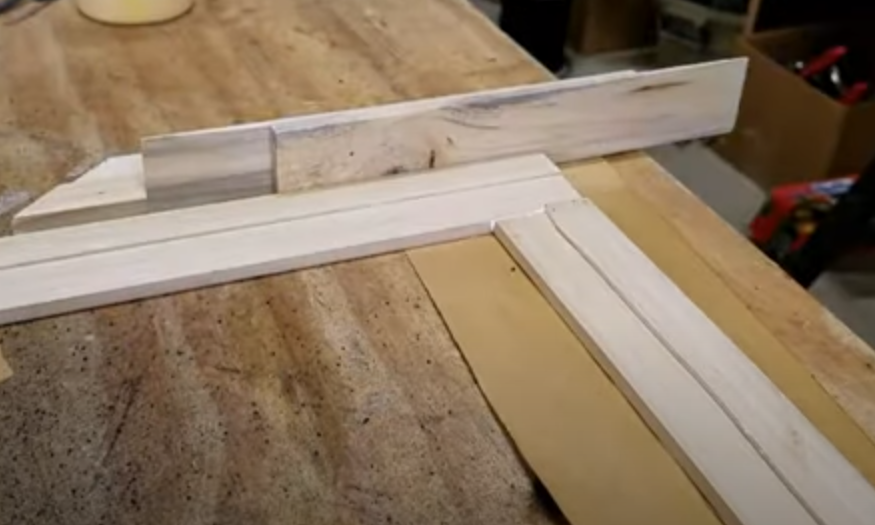
To cover the intake I started by making a very low-profile picture frame. I was going to miter the corners, but I wasn’t sure about my measurements and decided to use glue and butt joints instead.
I didn’t have any clamps long enough for the job, so I screwed some scrap pieces of wood (my test frame pieces) to my table, and wedged the frame tight. I also put some extra wood clamps around the frame to ensure everything dried flat.
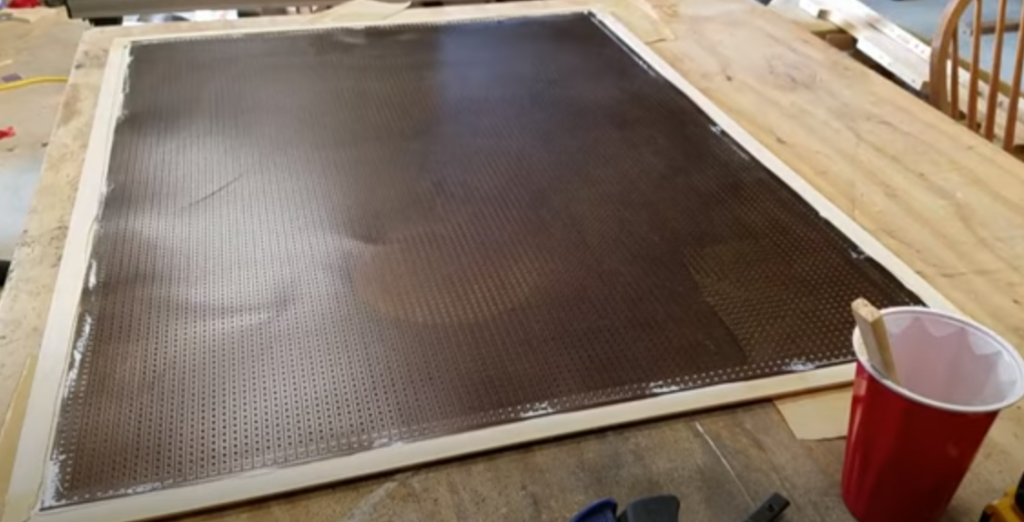
I cut the screen to size, glued and stapled it in place, and filled the holes with wood filler.
When everything was dry I did some quick sanding then moved on to paint.
I put on a quick primer coat, then three coats of the chosen ceiling color. I painted both sides because I didn’t want the thickness of the metal to be left exposed. In retrospect, this wasn’t necessary. Also, if I were to do this again I would paint the screen before installing it.
The screen is very fragile and dents if you look at it wrong or sneeze nearby, so be extra careful with whatever material you find.
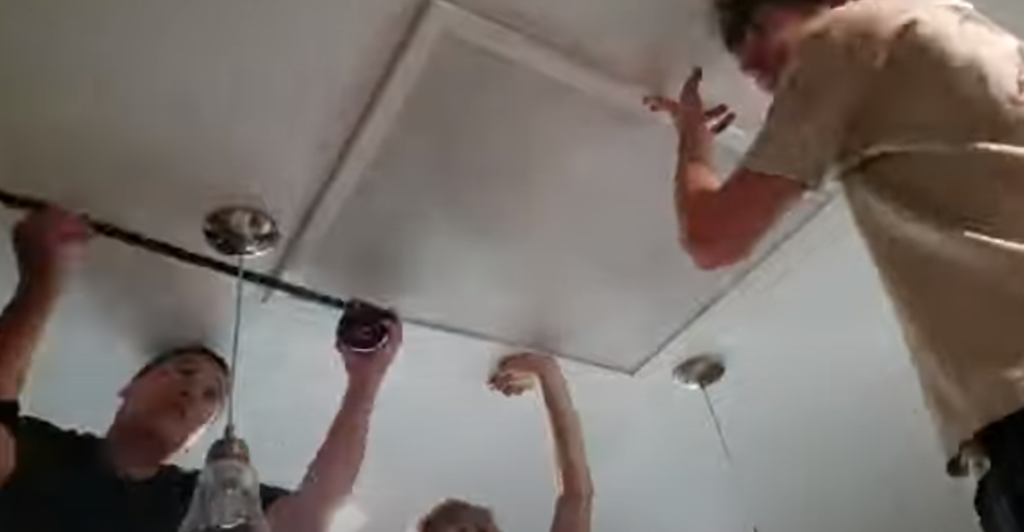
To install the screen I recruited my son and his friend. While they held the screen in place I checked my measurements to make sure it was square to the wall and evenly spaced between the light fixtures.
I secured the screen with some finish nails. In the near future, I will change those for some finish screws and install a filter to prevent grease and dust from getting into my duct system.
For as long as this project took, I don’t really think it was that difficult. The hardest part was working in the attic, and getting over the mental block to do that work. If you have any experience with wiring, or basic DIY renovation stuff I think this is a project that you can handle.
Here’s a cost breakdown (at the time of writing, mid-2021):
8″ elbow
$20
Venetian Screen
$33
8″ tee
$43
Insulated Flex Duct
$58
Uninsulated Flex Duct
$25
8″ Duct Take Off (x2)
$42
Backdraft Damper
$25
Hooded Exterior Wall vent
$63
Water-based sealant
$13
Exterior sealant
$11
Foil tape
$11
Exhaust Fan
$267
Altogether, this project cost roughly $611. I also bought some tools that I needed and some poplar for the frame. I only used a little bit of that though.
I hope this was helpful for anyone thinking about adding some kind of vent to their house. Be sure to check local codes, do your research, and be safe. Thanks for reading.
Don
Here’s a list of tools and hardware that I used to make this project happen (affiliate links):
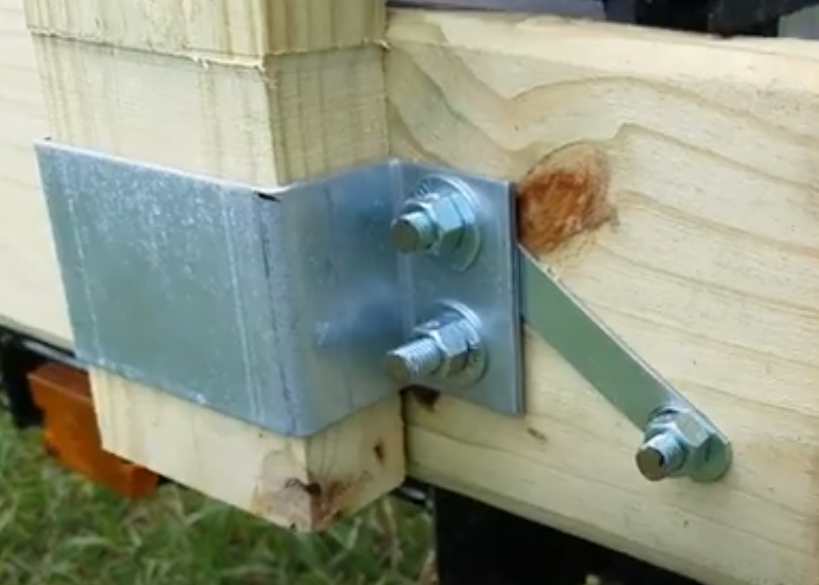
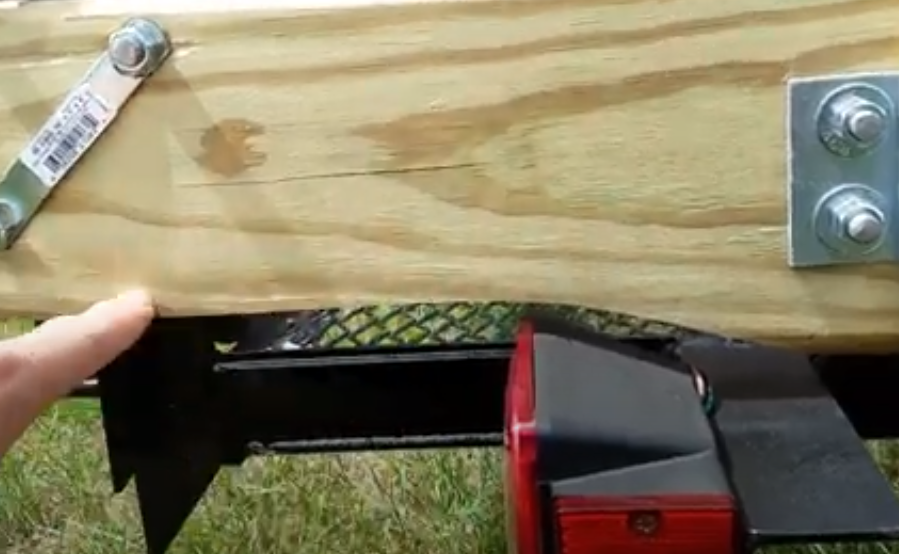
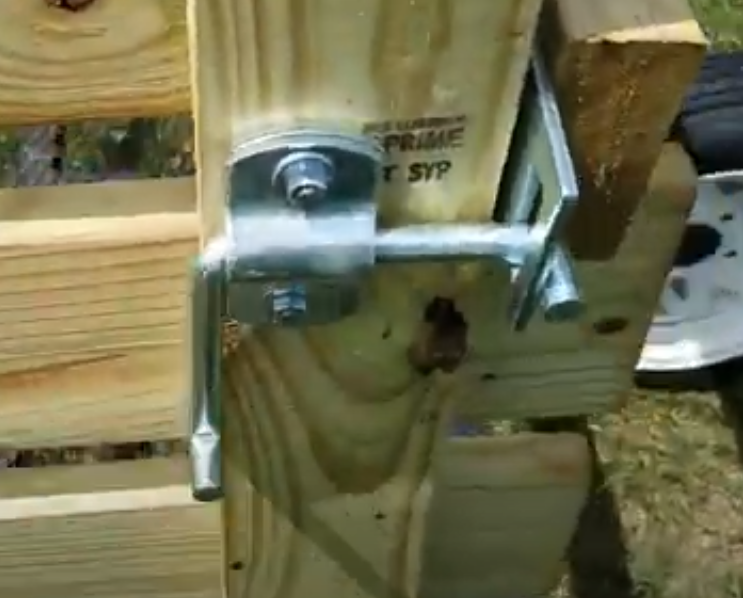
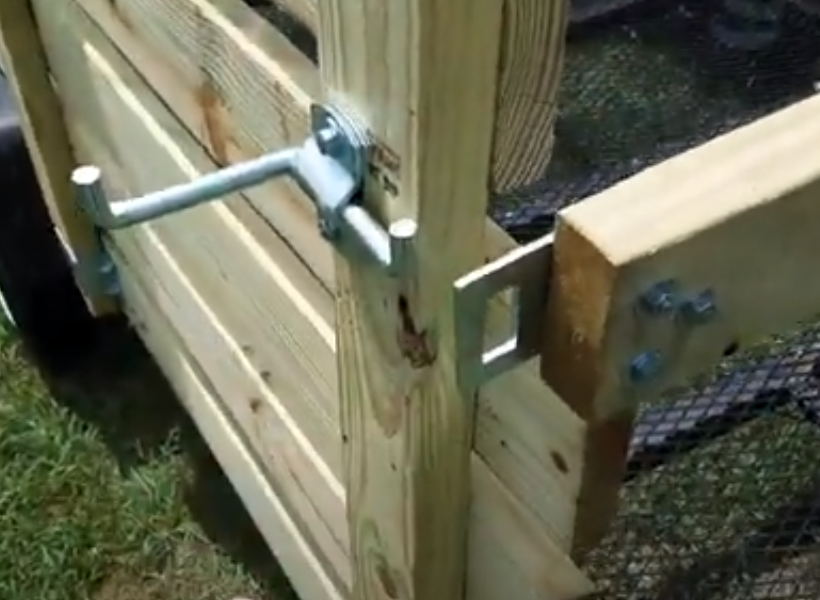
I wanted to add sidewalls to the exterior of my utility trailer and preserve the interior dimensions. Every example I found online showed the wood sides being added to the interior of the trailer. I hope you find this helpful.
Watch the video on YouTube
I bought this utility trailer from a big box hardware store for around $600 on sale. To make the trailer more enclosed and useful for our family activities I wanted to add some walls to the trailer. I wanted to keep the interior size as large as possible. I have kayaks that fit perfectly in that space, and making the trailer smaller would greatly reduce the efficiency of a loaded trailer.
I researched what other people had done to add sidewalls to their trailers and pretty much every example either put the wall supports on the inside, or they welded something in place. I didn’t have a welder at the time of making these alterations, so I had to come up with something else.
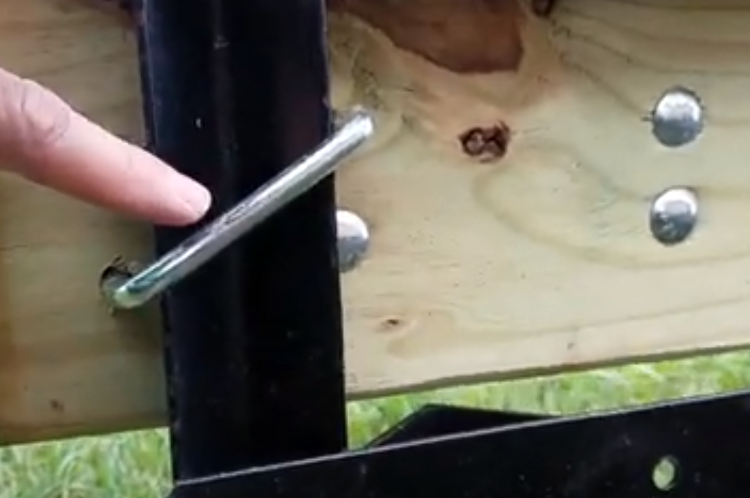
All the bolts I used were standard zinc-coated hardware. In the places where the bolts were too long, I cut the excess off with a grinder. To remove the sharp edges I sanded the ends with my orbital palm sander.
Adding the sidewalls cost me around $100 back when I did this in 2020. I hope this was helpful for anyone looking to add some extra capacity to their utility trailer. Let me know if you have any questions.
This idea came to me while watching a show where the villain achieved a great coordinated strikes against his enemy while enjoying a nice dinner with a new lady friend.
Okay, maybe not super villains who have powers and fight heros and just want to steal stuff, but maybe them too. I’m still working this out.
Lots of villains, especially the ones who rely on their intellect (Luthor, King Pin, Syndrome) accomplish incredible coordinated attacks and magnificent accomplishments with perfect accuracy. I’m sure lots of bad guys have delusions of being able to accomplish these kinds of atrocities. But it’s the ones who are really organized that make it happen. Not only do they have vision (like a CEO or company president might), they have the power to lead a team with precision and complexity that really points to Project Management on a grand scale.
CEOs and company presidents, in my experience, can drive the direction of a company, but they rely on management to help carry out their directives and goals. Good CEOs inspire and can be good leaders, of course. The thing that sets the best ones apart is that they can help layout a plan of attack.
While watching the above mentioned series (I’m not going to say exactly what it is because I don’t want anyone to spoil it for me, please) the villain works in a very removed, behind the scenes type way. I almost have to wonder what makes him so bad. I know he’s the bad guy. But all I’ve seen of him is some clumsy attempts to woo a lady and a vicious murder. The murder shows that he’s ruthless and unforgiving. That makes him a monster, but not a super villain.
Then, while having dinner with his new lady-friend, he coordinates a way for his former partners to rally together, gathering their strength for a huge attack, then he blows them all to smithereens.
Strategically, this was a power move on his part that took some obstacles out of his way and finally established him as the force to be reckoned with that I was waiting for.
As a project manager I couldn’t help but thing about all the work that must have gone into that strike. Of course, he had a good reliable team. He also had foresight and means to accomplish his goals.
I doubt he had a prepared statement of work, but he might have had a communication plan and a risk analysis.
This is his “super” power. Not only is he ruthless and powerful, he’s also organized. Behind the scenes his vision is being carried out because he knows how to accomplish his goals on time.
I give up. I wrote my book, I marketed it (weakly) for a while, I really didn’t sell many books. I tell my self that I didn’t write the book for the money, and that’s good because I’ve spent way more than I made.
I put everything out of mind for a while. I started a new job and I told myself that I was done with writing. I even started some new hobbies. Or, at least, I looked into some new hobbies. I don’t have enough free time to actually do anything with them.
But now I’m thinking about story ideas again. It’s tough to give this up. I have ideas for a sequel to Michael Sanders and the Destiny of the Qori, but I think I need a break. Instead, I want to write something more grown up and funny. So now I’m collecting thoughts and daydreaming about a new novel in a new world with new characters and new adventures.
When I told my wife that I wanted to give up writing she laughed. When I told her I had new ideas she said that this is who I am. I liked that. She’s so great.
I pre-registered for Disney+ in the hopes of logging right in on the launch date and subjecting my children to hours of old cartoons from my childhood. Instead, I spent hours on hold trying to figure out why my account was locked. After 6 days I finally got through and was told they had some kind of sync error and I needed to create a new account. Problem solved.
We’ve had Disney+ now for almost a month and I’m surprised that we haven’t watched it more. The huge library of options from the Disney portfolio offers enough content to keep anyone busy for a lifetime. But who wants to watch old movies all the time? That’s my realization anyway. Yes, I could go back and watch movies from my childhood or (almost) all the Marvel movies, but I don’t want to. I’ve either already seen them, or I don’t feel compelled to watch them again. I have rewatched a few, like Captain America, the First Avenger just because I was a little sketchy of some of the details and I wanted to see what happened to Red Skull that made him a slave to the soul stone (spoiler, he touched the tesseract).
I expected my children to watch it more too. More often than not I find them watching the same stupid Minecraft YouTubers over and over.
We’re all loving The Mandalorian, and the little baby yoda-child puppet (it’s so cute!). It’s nice to have a show that we can all watch as a family.
So why did I write this? Because I’ve had lots of thoughts about Disney+ and writing this out helped me to realize that they are all worthless.
I wrote a book. It’s a middle-grade novel for kids who like adventure, time travel, and fart jokes (one fart joke). Maybe check it out. Thanks.
About 2 years ago I posted about rewriting my book and making it much longer. I’ve recently finished the first draft and am working through the laborious task of editing. It’s possible I could be ready for a re-release by the end of the year. I’ve decided I want to retitle the book too. The Qori, The Illia, and Michael Sanders is a little too long for good SEO and stuff. I’d like to come up with something a little easier to rattle off when someone ask, “Hey, what is that book you’re reading?” If anyone who has read the book has any ideas I’d love to hear them.
I’ll be getting a new cover too, actually hiring an artist. I’m very excited for that step.
I’m excited for the new barn. That’s an understatement, really.
To help pass the waiting I used my old laptop and set up a camera to create a time lapse video of the construction process. It’s not perfect but I learned some things in the process and I’m fairly happy with how it turned out.
Here’s the video:
This is a pretty low-effort video. I didn’t add any intro our outro. I didn’t work very hard on the music. I mostly just wanted to get it posted. I’m feeling a little impatient, with the whole thing. And it’s Friday.
The barn isn’t 100% done yet either. The concrete floor will be done sometime next week or later. Then I still need to wire lighting and stuff like that. Not to mention rebuilding my collection of tools.
I want to thank Kevin Merrill from K & R Construction. His team did a great job and Kevin answered all my questions as the build progressed.